Showing posts with label plastic free. Show all posts

Sunday, March 20, 2011

Dirty Hands


The season is upon us for scrambling around, starting seeds, raking mulch and pulling back the dreary curtain of winter. I can't help but feel totally elated by the season of spring, and totally overwhelmed. Regardless of how much planning I put onto paper during the winter months, nothing can ever prepare me for the explosion of tasks that occurs each year.

Two weeks ago I managed to start several seeds for leeks, broccoli, onions and some cold-loving lettuce. I tend to start seeds earlier than I should and I lose so many seedlings each year it's ridiculous. What I don't lose tends to be stringy and unhealthy, so this year I decided to make myself wait until I was certain that I'd be able to transplant them into the garden before they unhappily rootbound or overgrown.


This is my first year using my soil blocker rather than plastic trays and cells. It's really quite beautiful to see my seeds starting in all natural context surrounded by wood and soil rather than plastics. It is more difficult to keep the soil blocks moist, but with some careful misting on a daily basis the seedlings have stayed happy and healthy thus far. I'm still waiting for the onions and the lettuce seeds to sprout, but the leeks and the broccoli varieties are all up. I was very happily surprised that one of the broccoli varieties sprouted at all, as I've had the seeds for at least six years!
Next week I will be starting the second phase of seeds, as well as some cool season crops out in the cold frames that i assembled last week (which will be blogged about in the next few days!) Most of my seeds will be started outside this year since I'm realizing more and more that whenever I direct seed, the plants end up as vigorous, if not more, than their pre-started counterparts.

Tuesday, March 1, 2011

Wooden Seed Flats


I've been working on building nine wooden seed flats that fit snugly into my seed starting shelves. These will be perfect to use with soil blocks that I make with my soil blocker. I estimate these cost me roughly $20-25 dollars to make total, and after some irritating discoveries about the quality of big-box-store nails I've finally finished them!

Now to start planting...

I'll try to post a tutorial for these if anyone is interested. They're made from a batch of locally milled cedar that was cut incorrectly and thus sold at a discount.

--
Do you start your own seeds? What do you start them in? Do you have any plastic free seed starting tips to share?

Tuesday, February 15, 2011

An adventure in rigging gutters

With the thawing snow yesterday we quickly learned that our sheep barn is less than perfect. I knew at some point it had gutters, but those had fallen off years ago and were wedged down under some brush by the side of the barn, overgrown and snowed on. Unfortunately due to the lack of gutters, when the snow began melting there was a constant downpour along the overhang of the barn. This downpour, combined with the snow on the ground, made a slushy muddy mess of the entrance to the barn and all I could picture was muddied fleeces and hoof rot. I know, I know... perhaps I'm a bit paranoid.

Anyway, despite having a very sore back yesterday I knew I had to fix the gutters as quickly as possible before the growing mud puddle could reach the sheep's stall where they often lie in the straw. I went out in the morning, before even tapping the maples, and proceeded to free the old gutters from their would-be graves to give them purpose again. I began reattaching them to the barn, using screws instead of nails in case I ever needed to pull them down again.

It wasn't until I was attaching the final section of the gutters that I noticed it was still dripping into the mud puddle. To my horror I realized that the years of rest had left the gutters rusted and full of pin-prick holes! Ugh!

I attached the final gutter and trudged back to the house, defeated.

This morning, however, I was struck with a fantastic idea. I needed a way to cover the holes at least until things dry up and I can caulk them. Originally I had thought duck tape (duck brand, not duct) but I knew that because the gutters were already wet this would be a frustrating and impossible endeavor. Then I thought about getting a caulk designed for wet application like pool tiles. Even if I could overlook the terrible toxicity of this stuff, none of it sets up below 40ยบ so there was no way it would work. Drat! It wasn't until I had vetoed at least three other ideas that it came to me.

Feed bags! Feed bags, on the shiny outer side, are heavily water resistant. If I nested them correctly, I could cut them into strips and line the gutters with them. Of course, I never thought this would really work...

Time will only tell how this holds up, and I'll have to see if I can find some used gutters on craigslist or something eventually, but this is certainly working for now! Hooray for improvisation!

Wednesday, February 9, 2011

A quick update on my Plastic Free February

I'm sorry I've been slacking on the coverage of Plastic Free February. I figured I'd do a super quick post to share some tips and facts I've learned in the past week of trying to live without plastic.

  • Nearly every restaurant will oblige you with plastic-free carryout if they can.
    This might mean getting your side-o-guacamole dumped on top of your burrito at Chipotle, but you can definitely still eat it! I also discovered with Chipotle that while I usually enjoy using a fork, if my alternative is plastic I can definitely eat anything from their menu using tortilla chips as a utensil.

  • We buy our water from the grocery store. I know this is totally taboo in the "natural living community" but our well water tastes like eggs and while it's been deemed potable, I cannot stand the slimy salty taste it has after it has gone through our softener. Our softener is turned down to the lowest setting possible, too. That said, when we buy water I always look at the plastic jugs we store it in and this little voice in my brain goes "Ewwwww..." but for some reason I never set my mind to finding a solution. I'd seen folks come in with huge glass 5-6 gallon jugs but for a 5'3" me those just aren't feasible without some sort of dispensing system, and all of those systems are not only over-the-top expensive, they're totally plastic as well.
    My solution came to me this morning while I was daydreaming about making elderberry wine this spring. Cider Jugs. Duh. Cider still comes in glass jugs in some places, and those glass jugs are a gallon, and would be easily refillable at the water station in the grocery store. I'm still trying to find a source for jugs with threaded caps rather than pop-off "snapple caps" as they call them, but I'm on the right track! Plastic be damned!

  • It is nearly impossible to buy art and craft supplies without plastic of some sort. Last night we made a run to the craft store and I picked up some new watercolor brushes. I bought the brushes with natural bristles and wooden handles, but they still had the little plastic tubes to protect the bristles from being mussed. Of course, having once worked in an art store I know that there are always brushes without these little plastic tubes (whether they were lost in transit, or pulled off by some obnoxious little kid) so I plucked the little plastic tubes off of my own brushes and snugged them carefully onto the heads of brushes that otherwise might have been overlooked by discerning customers due to their unprotected bristles. Tada! No plastic. Of course, I was dooming someone else to buying the plastic, but I was also protecting the bristles of the brushes that might otherwise have been discarded due to shelf-wear.

  • I have made a few quick goals for myself for February, other than the glass cider jugs. One is to switch to all glass containers for my cooking herbs and spices so that I can buy them in bulk from now on instead of buying little plastic shakers. The other goal is to eliminate all plastic in my daily hygiene. This means (dun dun dunnnn) making many of my own hygienic products. Just this morning, Chiot's Run posted a fantastic tutorial for how to make your own tooth powder, and I am strongly considering switching to it (though I'll flavor with peppermint or cinnamon rather than lemon) if I can find a way to keep my teeth nice and strong without the use of fluoride.

  • My final note is that at some point I plan to do another tutorial for upcycling plastics. I have now used plastic feed bags to make a boot tray, and my mother has found a way to turn the wooden boxes that clementines come in into seed starting trays by using the plastic mesh that comes on the box lid. I've got to find the time to photograph and document these so I can share them, but let me know if you have any other ideas!

Wednesday, February 2, 2011

Plastic Free February - Upcycling Livestock Feed Bags part one: Grocery Bags


One of the biggest challenges in my endeavor to cut down on my plastic dependence is in the animal husbandry aspect of my life. I am the happy and proud caretaker of eight horses (who live down the road at Constantine Farms), three sheep and a handful of ducks, not to mention our dogs and cat.

During the summer nearly all of my horses, except for anybody who is growing (my five and six year old national show horses) or old (my 18 year old arabian school horse), survive healthily by eating grass and hay, supplemented with selenium rich mineral blocks since our area is selenium deficient. Because of this I go through very little grain, and consequently livestock-related plastic.

Winter is another matter, though. My horses are all hard working, and while they get ample hay, they require roughly 3-4lbs of grain per beast per day to keep fat over their ribs during the cold months (this is still very little compared to most horses). Our grain bags used to be packaged in paper, and while this meant I occasionally had to deal with bag breaks in the car and spilled grain, to me it was worth it. The paper was biodegradable and since it was often unbleached I could even use it as mulch to keep weeds down with very little concern for what was leeching into my gardens. They switched all grain to plastic bags roughly six months ago and I've been at a loss for what to do with the waste. For the most part, they've been used for garbage bags and ultimately thrown away.

Two nights ago I was struck with the idea to find new uses for them, after reading about Rodale's No Plastic February challenge. They're made out of a sturdy woven plastic that seems to hold up to a lot of wear, regardless of surrounding temperatures.

My first idea is to use them for grocery bags. I hate the idea of buying those 99 cent heavy duty reusable plastic bags because ultimately you're buying plastic. The fabric bags are great, but they are expensive or require some serious skill to make. Using the feed bags allows me to get two grocery bags out of each feed bag, saving money and using what would otherwise be thrown away. I do apologize as this isn't a particularly well photographed or articulated tutorial. Please let me know if you have any other questions, and be sure to check back soon for more upcycle patterns!


DIY: Grocery Bags from woven plastic feed bags


Start with a clean plastic feed bag. They're easy to hose out during the summer. During the winter, I just worked with mine dirty and cleaned it out after I finished the project.


Cut the feed bag in half, so that you have a front and back. Most bags have great creases for this and will indicate perfectly where to cut. Then trim two strips off of what used to be the back of the bag, for handles. These can be as wide as you like. You will be sewing these strips to create more finished straps, so make them two to three times wider than you want the final strap.


Fold the handle strip over and stitch along the edge, and then flip and repeat. This can be as accurate and carefully executed as you like. Mine are all very rough and poorly sewn since that's the kind of gal I am.


Fold the bag in half and cut slits roughly two inches from the center of the bag. Cut these slits two inches long.


When you unfold your bag, the cuts should look roughly like this.


Then hem the two ends (along what would be the top and bottom of the original feed bags).


I awesomely forgot to photograph when I put the handles on, so this photo contains two steps. First, stitch the handles to the front or back of the plastic while it is still flat. You can reinforce the handles as much as you like. This is the part my sewing machine disliked the most and I had some difficulty keeping the tension balanced but eventually it worked. After attaching the handles, fold the bag in half, inside out. Then stitch across the right and left sides, being careful not to stitch across the original slits you put in the bag. Those slits will become the square bottom of your bag.


I know this photo is hard to see but once your sides are stitched work the bag around until your bottom flaps are flush with the two side flaps that you just stitched together. I'm sorry if this is hard to understand. It's much easier if you just look at it and fiddle around with it until you get it sorted out.


Your final sewing will be across the bottom flap, connecting the bottom flap to the side flaps.
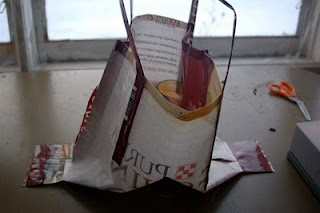


When you finish, you can open the bag and it should look something like this. The last thing you need to do now is flip it right-side out!


Obviously this tutorial is pretty vague, but if you can get through making your first bag, you should be able to then alter the pattern by adding pockets, changing dimensions and fiddling with measurements to make a wide variety of recycled/upcycled objects.

Please let me know if you come up with any additional suggestions for this project, as well as any other ideas for reusing feed bags.

Thanks for visiting! I'll be posting more upcycling patterns and suggestions over the next few weeks to help deal with the more unavoidable plastics in our lives.

Tuesday, February 1, 2011

My own Plastic Free February

Plastic Free February is a challenge set up by the Rodale Institute's web site. I usually roll my eyes at theme-months. February should be "Seed Starting Month" if anything for me, but the idea of a plastic free month has tickled the back of my head for years.

The Rodale challenge has three rules for their plastic free month:

1. No buying or acquiring new plastic.

2: No cooking with plastic or storing food in plastic.

3: Minimize all other plastic use.


It'll be hard not to store food in plastic, but I think I can manage to use canning jars instead (despite the super minimal plastic on their lids). Not buying or acquiring plastic will be difficult, however. Plastic is in everything, and it's nearly impossible to buy anything without plastic packaging these days.

A big problem that I'm going to have with the plastic free month is that I really cannot avoid plastic in some aspects of my life, especially where the farm animals are concerned. While I can avoid plastic in the things I purchase and use myself, I have lives that depend on me and those lives often depend on things that come packaged in plastic. I have horses eating grain from plastic feed bags, and sheep/ducks/horses all eat hay and straw that, while it usually comes with natural twine, once in a while is baled with plastic twine. I would love to feed real food like Lisa and Frank over at Mack Hill Farm, but at this point that's kind of unrealistic for me as we have no connections and no truck. Boo.

I have therefore added a fourth rule for myself. When rules 1, 2 or 3 are broken, I will do everything within my power to reuse or upcycle the plastic I use in February. Any foodsafe plastic container will become a seed starting tray, every plastic feed bag will be reused to line seed starting shelves or upcycled into something else, plastic twine will be knit/crocheted into produce bags (see future blogposts for some of these - I've got some great ideas, including how to make reusable grocery bags from feed bags!)

Hard plastic that is harder to reassign can be cut up and used to mark seed starting pots, and at the very worst (as with things like toilet paper packaging) I will buy only things packaged in recycled or recyclable plastic. I will also make a point to go to the small mom-and-pop hardware stores to purchase farm hardware necessities (hinges, screws, nails, etc) that come packaging free and in bulk.

Plastic containers like these milkshake cups (which contain 100% natural and local dairy) will have new lives as seed starting containers.

Hopefully this won't become too much of a stress for me. I have a feeling I'll be toting around a sizable knapsack this month to house my reusable bags, glass takeout containers and probably even a set of silverware to use if we go out to eat. I may look like a crazy person, but I'm okay with that (and kind of used to it!)